Pages

Sunday, March 17, 2019

Groovy Series 4: Playing with cell level formatting

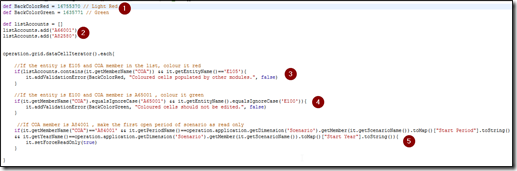
When it comes to highlighting certain data cells or making them read only, we all must have got our hands dirty with validation rules and valid intersections. Undoubtedly, they make things quite descriptive and help to control data entry when required. But at the same time, the trouble to maintain all these objects is equally troublesome.

Lets consider three random scenarios which client must have proposed to highlight certain cells on a data form or make certain cells read-only

  1. If the entity is E105 and COA member is among ‘A66001’ or ‘A82580’, colour it red
  2. If the entity is E100 and COA member is A65001 , colour it green
  3. If COA member is A84001 , make the first open period of scenario as read only

Considering the above requirements, if we intend to implement them, we would have to create validation rules to highlight the cells and create valid intersections to make specific cell read-only.

What if, we have multiple calculating scenarios which run in isolation, say Plan scenario where users save their forecast and another Plan1 where only corporate tweak the planned numbers during the year. Achieving this via valid intersections should still be possible, provided we create them with caution and maintain these many substitution variables to keep a track of first open month for a scenario. Similarly, what if these accounts are used on multiple forms, we would have to maintain these many times the validations rules we defined for one.

How about we have Groovy scripting capability in our application and lets see how Groovy makes our life easy by just maintaining a small piece of code which can be tagged to any form to serve the same purpose.

image

def BackColorRed = 16755370 // Light Red

def BackColorGreen = 1635771 // Green

def listAccounts = []

listAccounts.add('A66001')

listAccounts.add('A82580')

operation.grid.dataCellIterator().each{

//If the entity is E105 and COA member in the list, colour it red

if(listAccounts.contains(it.getMemberName("COA")) && it.getEntityName()=='E105'){

it.addValidationError(BackColorRed, "Coloured cells populated by other modules.", false)

}

//If the entity is E100 and COA member is A65001 , colour it green

if(it.getMemberName("COA").equalsIgnoreCase('A65001') && it.getEntityName().equalsIgnoreCase('E100')){

it.addValidationError(BackColorGreen, "Coloured cells should not be edited.", false)

}

//If COA member is A84001 , make the first open period of scenario as read only

if(it.getMemberName("COA")=='A84001' && it.getPeriodName()==operation.application.getDimension('Scenario').getMember(it.getScenarioName()).toMap()["Start Period"].toString() && it.getYearName()==operation.application.getDimension('Scenario').getMember(it.getScenarioName()).toMap()["Start Year"].toString()){

it.setForceReadOnly(true)

}

}

Lets understand different part of the code

  • In section 1, we declare the colours that we intend to use to highlight cells defined in the conditions. The numbers for the colours are decimal numbers which can be easily obtained from web. Websites like convertingcolors.com can be used to fetch the decimal code for a colour by providing RGB or Hex value
  • In section 2, we create a list of accounts which need to fulfil the condition in scenario 1 above. Such lists can also be generated from the smartlist entries maintained within applicationimage

  • We traverse through each cell in the grid by using the dataCellIterator method of the grid which is in operation. We cover the first scenario by checking if the current member from the COA dimension is part of the list we created above. We use the validation error method of the data cell to highlight the cells in red as if we would have done by creating a validation rule on data form in non-groovy worldimage
  • While traversing through the grid we check for second scenario too and highlight the cells in green. Groovy gives us multiple options to write same thing in different ways. In above bullet point, we compared the member names with a == sign. We can code the same thing using equalsIgnoreCase in case we feel case might cause issueimage

  • Lastly, we check the Start Period and Start Year properties of the Scenario to make the cell read-only. these properties can be accessed using the properties map of the scenario dimension members. The method to setForceReadOnly will make the cell read-only.image

Interestingly, in a non-groovy world we need to maintain multiple substitution variables and ensure they are updated to achieve the last scenario. Groovy is dynamic in nature and picks up the first open period of the scenario to make the cell read-only.

Our entity dimension is structured like this image

and scenario dimension has two calculating scenarios, one with start period as Sep FY20 and other with Jul FY20

image 

We tagged the groovy rule to our form as a business rule. With business rules of type groovy, we have additional options to run these rules and in our case, we do it after load so the grid loads into memory and operation.grid acts upon this grid.

image

Scenario 1: If the entity is E105 and COA member is among ‘A66001’ or ‘A82580’, colour it red. Important to note, scenario 3 also gets fulfilled where Jul month for the line 84001 is read-only.

image

Scenario 2: If the entity is E100 and COA member is A65001 , colour it green. Similarly, scenario 3 also gets executed here too

image

Scenario 3: If COA member is A84001 , make the first open period of scenario as read only. For scenario Plan, first month is Sep, which turns read only while in earlier snapshots, the scenario was Plan 1 and Jul month was read-only.

image

I used the last scenario recently to cater to client’s request where they wanted the variance between their Forecast and Budget to be entered as lumpsum number in one adjustment account for them to review. Similarly, forced read-only makes the cells read-only for admin too avoiding the cases where admins edit the numbers unknowingly.

This groovy rule can have all such conditions listed together in single rule which can be attached to multiple data forms making them behave the same way.

Hope this helps !!!